Group Revit Rooms by Area

Mar 16, 2015

Group revit rooms by areas in which they are contained

In this video, I walk through how to find which Rooms are in a specific Revit Area. Using Areas to define space is a common workflow for many architectural projects and the OOTB Revit does not implicitly have a connection between Loadable families and Revit areas, however, there is a good connection between Rooms & Elements. Using Dynamo we find all the Room location points that fall inside a Revit Area then update a Room parameter to reflect the Area‘s number. Once that is done we can then schedule all families by Area using normal Revit schedules.

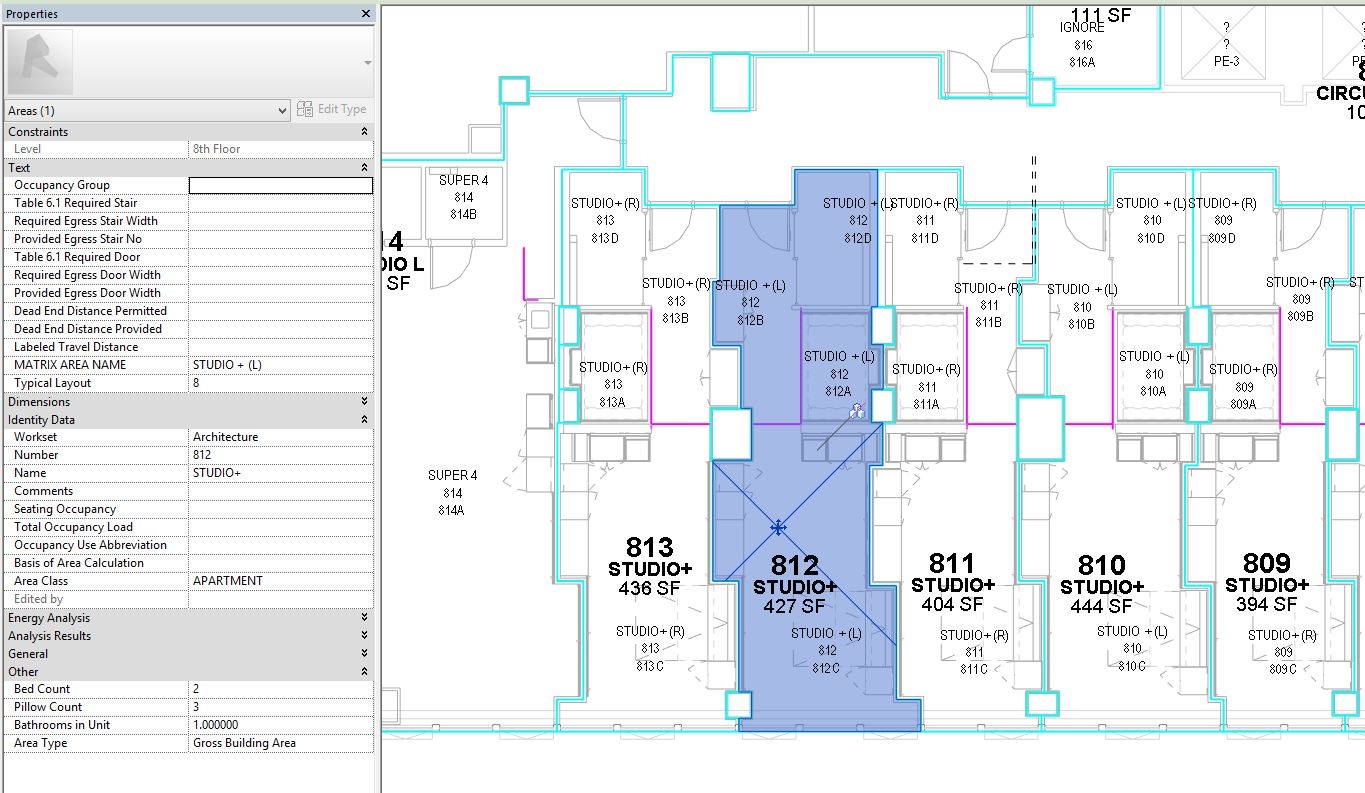
We first have to start by defining the space with one Area Type, in this case, we used “Gross Building Area” however you can make your own. The really nice thing about areas is that we can run multiple different spatial configurations. In this model, we are also running Light & Air Areas to do all the calculations. I'll review that workflow next, below is the Area representing one Apartment on a floor that will have multiple rooms in it.

image

We are going to do what is called a Polygon.ContainmentTest [native Dynamo] to find which Room location points lay within the polygon of each Area. We first have to break down the boundary line to points and then build a polygon. This is then used with poly contains node [remember to update lacing to Cross Product] and this in-turn s sets up a FilterBoolMask to get he Room elements that are within the polygon.

image

We will need to prepare a list to do a SetParameterValue on the Rooms elements to update a parameter. To build a list of Area Numbers and Area name of equal length and nesting than what we are getting out of our FilterBoolMask, we need something called a List.OfRepeatedItem. We take the single readout of the area number and plug that to Item. Then we do a List.Count on the Room elements coming out of the FilterBoolMask [actually IN]. This will create a list that we can then feed into the SetParameter Node.

image

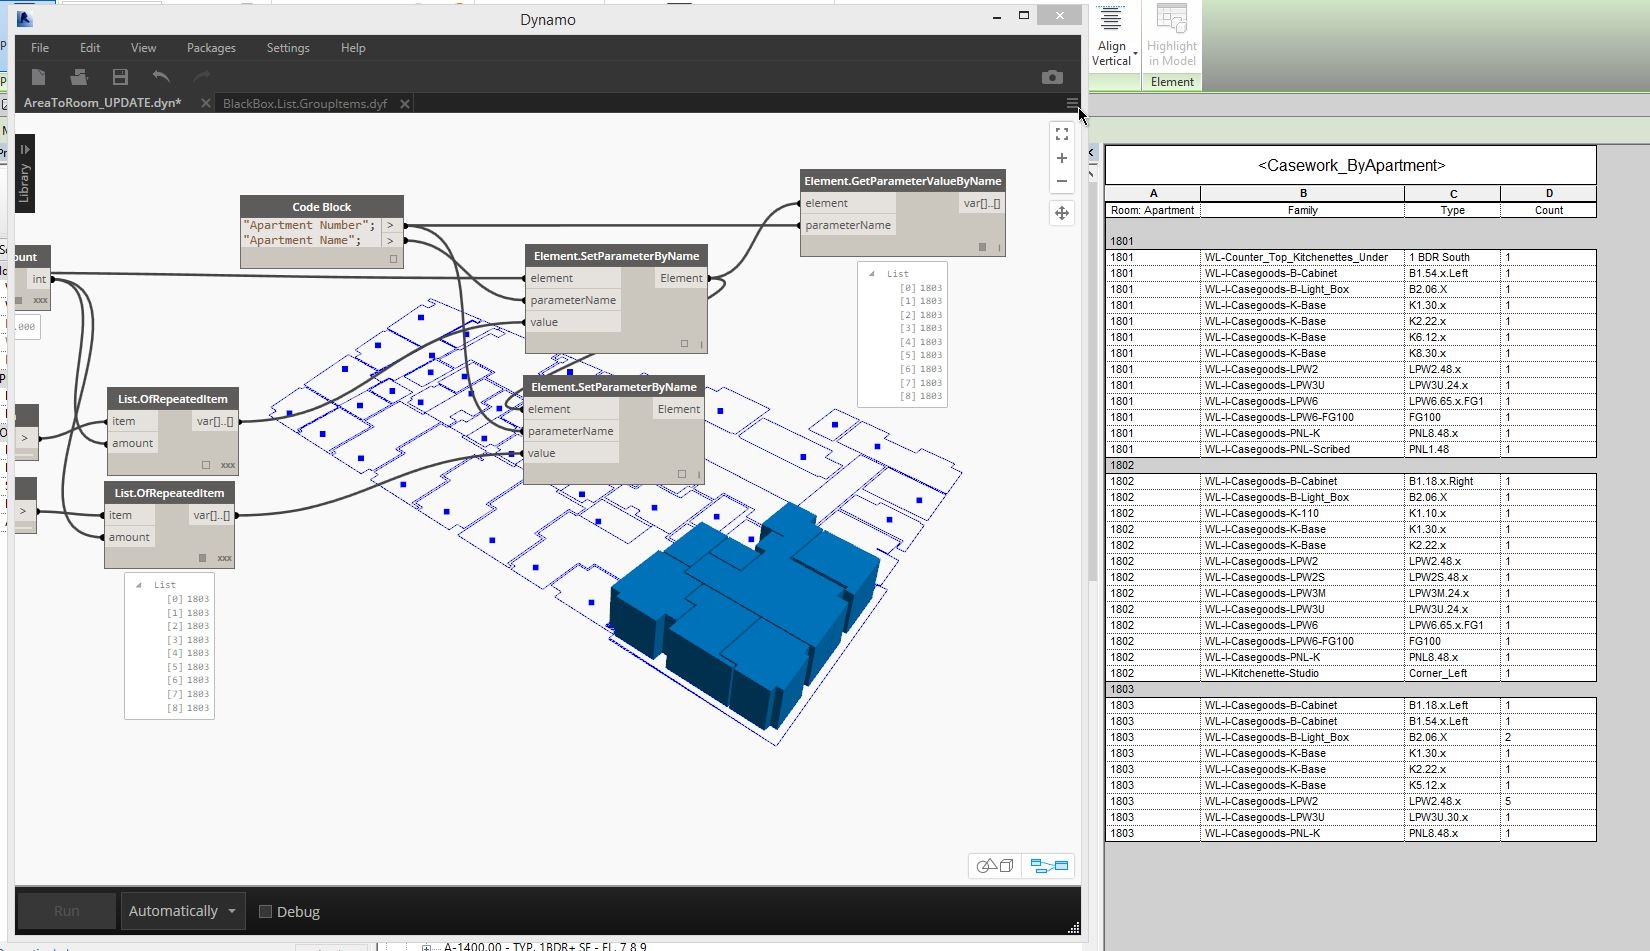
The last part of the Dynamo workflow is to SetParameter of the Elements. This is pretty straight forward for each element from the FilterBoolMask the parameter values will be updated to reflect the Areas Number and Name to a parameter of the Room. Now each Room will have a value for the Apartment Number and Name it resides in.

In Revit then, make any Schedule of loadable families, but add the Parameters from the Room Element you set above with Dynamo, now you are scheduling by Area! If you have some elements not scheduling per Area try turning on the Room Calculation Point in the family. This should work through nested families too.

  • Nextfolio is built with Next.js.
  • Nextfolio uses pnpm for package management.

CodeBlocks

// This is commented-out code
export default function HelloWorld() {
  return (
    <h1>Hello, World!</h1>
  );
}

Images

Nextfolio uses Next.js Image in MDX for seamless image rendering:

<Image
  src="/opengraph-image.png"
  alt="OpenGraph image"
  width={640}
  height={500}
/>

Renders:

OpenGraph image

Image Grid

Nextfolio uses a custom image grid component to display image galleries.

<ImageGrid
  columns={3} // Accepts 2, 3, or 4 columns
  images={[
    { src: "/photos/photo1.jpg", alt: "Photo1", href: "#" }, // 'href' is optional
    { src: "/photos/photo2.jpg", alt: "Photo2", href: "#" },
    { src: "/photos/photo3.jpg", alt: "Photo3"},
  ]}
/>

Renders:

Photo1
Photo2
Photo3

Embeds

YouTube Videos

Nextfolio uses react-youtube to embed YouTube videos in MDX posts.

<YouTube videoId="wXhTHyIgQ_U" />

Renders:

Captions

Nextfolio uses react-wrap-balancer to evenly balance captions in MDX posts.

<Caption>
  Captions that flow smoothly, making your content easy to read and visually
  appealing with a clean look.
</Caption>

Renders:

Captions that flow smoothly, making your content easy to read and visually appealing with a clean look.

Tables

Nextfolio uses a custom table component to render tables in MDX posts.

<Table
  data={{
    headers: ["Title", "Description"],
    rows: [
      [
        "First item",
        "Lorem ipsum dolor sit amet consectetur adipisicing elit. Aliquid perspiciatis repellat amet quos.",
      ],
      [
        "Second item",
        "Lorem ipsum dolor sit amet consectetur adipisicing elit. Aliquid perspiciatis repellat amet quos.",
      ],
    ],
  }}
/>

Renders:

TitleDescription
First itemLorem ipsum dolor sit amet consectetur adipisicing elit. Aliquid perspiciatis repellat amet quos.
Second itemLorem ipsum dolor sit amet consectetur adipisicing elit. Aliquid perspiciatis repellat amet quos.

Math Expressions

Nextfolio allows you to render mathematical expressions in MDX posts using KaTeX . Simply wrap your expression in $ to include KaTeX within your MDX content.

$
\int_0^\infty e^{-x^2} dx = \frac{\sqrt{\pi}}{2}
$

Renders:

0ex2dx=π2\int_0^\infty e^{-x^2} dx = \frac{\sqrt{\pi}}{2}

Callout

Nextfolio uses a custom callout component to render important information in MDX posts.

<Callout emoji="💡">
[Nextfolio](https://nextfolio.site) is a clean, simple, and fast portfolio built with Next.js, Tailwind CSS, and pnpm for optimal performance.
</Callout>

Renders:

💡

Nextfolio is a clean, simple, and fast portfolio built with Next.js, Tailwind CSS, and pnpm for optimal performance.